Assuming nobody reads the “About” page on blogs during a first glance a secondary introduction is excessive, however–to be brief–Hello!
Ever walk down an aisle at a super market pick up a package of ________ and just hold it for a second? The texture is familiar, the scent through the thin film is reassuring, the little stamped date is informative and the series of numbers that assault the eyes on the reverse of the package are “important”. Dorm rooms are filled with these packages, and with reason. Those products are often cheap, filling, consistent (last a bit longer than the date suggests) and easy.
Cooking isn’t easy–at least not the way I cook. Most of my recipes are simple, with short instructions, but almost all of them require work. Besides, who wants to work more when tackling a job and being a full-time student? I do.
Regardless, it’s summer now, let’s talk about hamburgers. With that in mind, the recipe below is not of the namesake, this is a recipe and process for the familiar sesame bun.
Ingredients
- 16oz Flour (AP or Bread Flour, whichever will work)
- 7 fl. oz. Warm Water
- 2 oz sugar
- 1 oz melted butter
- 3 eggs (two egg whites and three yolks)
- packet of active dry yeast (2 1/4 tsp)
- 1 tsp salt
- Sesame Seeds (totally optional)
First, combine the sugar and warm water so that the sugar dissolves–add this first in hot water and let it sit, sugar will not dissolve in cool water–once the water is lukewarm add the yeast and whisk it gently. Let sit for 10 minutes, the yeast will begin to foam (if it does not foam at all, the yeast is probably dead, luckily yeast is cheap in bulk!)

Whisking the yeast and sugar.
While the yeast is activating, sift the flour into a large bowl, add the salt and stir to combine. Create a well in the center so that when you add the yeasty water (not beer! though you could use warm beer and yeast for a more hoppy bun), egg and butter they will remain in the center.

Still Alive!
Just before you are ready to introduce the dry and wet, beat an egg and a yolk in a small bowl with a fork (using a whisk is a possibility, but the extra air is superfluous). Dorm kitchens are frequently equipped with microwaves, you can choose to use one– I enjoy washing dishes; so I melt my butter in a pan, this also makes the butter slightly nutty in flavor and color.
Add the yeast, egg and butter to the well and combine. I use my hand to mix the ingredients, it’s very sticky stuff. To do this, arrange all of the fingers of your dominant hand so they are fixed to a point and (at first) gently make circles with your hand-cone, as the flour absorbs the moisture it will become harder to do this, but stand mixers are expensive and hands are incredible.

Organic Stand Mixer, dough hooks, whisk and paddle attachments can all be attached.
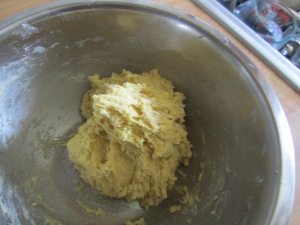
Consistency of the pre-kneaded but fully integrated dough.
At this point, remove the dough, and lightly grease the bowl with butter (it makes everything better) now knead the dough on a lightly floured surface for 10-15 minutes. Kneading is an exercise, I don’t have pictures for this recipe, but I will have them for future ones. If you have a stand mixer you have to regulate how long you knead for–for fear of over-kneading! It is basically impossible to do this with your hands, kneading is a time for thinking about something other than the activity (as you might do for whisking if making hollandaise at home). We knead the dough in order to form the meshy protein structure gluten, which is what allows for breads to hold onto air and expand without exploding. You’ll want to knead until the dough loosely passes the window pane test–take a small piece of dough and stretch it between four fingers and hold it up to a light, the more you stretch it (with fewer tears) the more translucent it will become.

Rough window pane test- it doesn’t need to be perfect, but it requires decent kneading!
Now, set the dough in the metal bowl and cover with plastic wrap and put it somewhere–(if you have a communal fridge, I wouldn’t recommend there, vagrant fragrances imbue dough with icky stuff) a warm place is good for an hour and a half, a refrigerator would take about 8-12 hours for the dough to double in size, but it will be more flavorful–recover the dough and put it on a lightly floured surface.
Most people tell you to punch the dough down or to knock it back–food does not like violence gently use your knuckles to press the air out of the dough.

Day at the Spa, with tanning soon to follow!
At this point you will need a half sheet tray, or a cookie sheet, furthermore, grease it lightly with butter. Take the dough and cut it in half, then cut those two in half, &c. so you have the dough squares. at the desired size. Take the dough squares and rolls them by encompassing all but the bottom of them in your hand and moving your hand in a circles against a wooden surface, this will give you a tight skin. Put them on the sheet as you go and then wrap with plastic.

The tight fit will get tighter as they rise, this is okay!
Let rise until they are doubled in bulk, meanwhile set the oven to 375°F. Remember the third egg from the ingredient list? Crack it and beat briskly with a tiny amount of water. Once the rolls have risen, remove the plastic and apply the egg wash and sprinkle on the sesame seeds. Put into the oven for 30 minutes to an hour–why such a vague time period? Glad you asked, your altitude, exact oven make and model, whether you use gas or electric all effect this.

Look familiar?
So, why go through all the trouble? Well, you can make buns and size you want, which means you can make appropriately sized burgers. Not to mention, they taste like bread, granted many people don’t want to eat real bread with a burger, but that’s a personal decision. Plus baking bread brings people together. The word companion comes from the latin com with panis bread–
I’ll be honest–if you’re buying all of the equipment and have no pantry that I used this may seem like an expensive project. Flour is cheap if you buy it in 50lb bags–get a couple of friends together and split the cost, it’s around $25, water is free in a dorm (though filter it if you think it tastes like pool water from the Y) eggs are cheap depending on where you live and how you get them, I use locally produced eggs, &c. for the rest of the ingredients. If you live in New England, Tag (Garage, lawn, church &c.) Sales are a great way to get cooking tools for next to nothing. A lot of people purchase one too many mixing bowls and then want to sell them.
Like a mathematical function, most inputs have an output, the same particularly true for bread, a simple list of ingredients with a rigorous process yields elegance.

Cheers.

WANT!!!!! Welcome to the blogosphere, Resident Cook. 🙂
Thank you!